Today, I set out to build a local Continuous Delivery (CD) pipeline using some cool looking tools: Harbor, Gitlab Runner and ArgoCD. As an environment I used minikube cluster. My main goal was to set up a complete CD workflow where I could seamlessly deploy and manage my Kubernetes applications. I didn’t want to prepare very sophisticated pipeline, however it might be a good starting point for more advanced examples.
To get there, I needed Harbor to act as my container registry, GitLab Runner to handle the CI/CD pipeline, and ArgoCD for synchronization between kubernetes cluster and git repository.
By the end of this process, I hoped to have a full functional pipeline.
Requirements
- kubernetes cluster (in my case it was minikube)
- ingress enabled
- helm
- kubectl
Harbor
Harbor is an open-source container registry designed to securely store, manage, and scan Docker images. In our GitOps pipeline, Harbor acts as the central registry where Docker images are pushed after being built by the GitLab Runner. These images are then pulled by the Kubernetes cluster during the deployment process.
I started the process by adding Harbor’s Helm chart repository. I really like Helm charts, which saves a lot of my configuring time. Usually, charts are well configured by default and required a minimal configuration.
In order to add Harbor chart, I had to run following command:
helm repo add harbor https://helm.goharbor.io
helm repo update
Once the Harbor Helm repository was added, I ran the following command to get a baseline configuration for Harbor:
helm show values harbor/harbor > harbor.yaml
This command fetched the default values for the Harbor Helm chart and saved them into a file called harbor.yaml. I’m a big fan of saving this file for each chart, which allows me to review default configuration. For example, by default ingress is enabled for this chart and exposed by domain core.harbor.domain.
With the Harbor configuration saved in harbor.yaml, the next step was to install Harbor into the Minikube cluster using Helm.
helm install harbor harbor/harbor --namespace=registry --create-namespace -f harbor.yaml
This command installed Harbor using the values from harbor.yaml, within a Kubernetes namespace called registry.
Next, I needed to configure local DNS to access the Harbor UI. I edited the /etc/hosts file by adding an entry that mapped the Minikube IP ($ minikube ip) address to a domain I assigned to Harbor:
/etc/hosts
<minikube-ip> core.harbor.domain
This setup was essential because Harbor’s web interface, and its API, needed a domain name that could resolve to the Minikube cluster. By manually adding this entry to the hosts file, I could reach Harbor via core.harbor.domain in my browser or when pushing/pulling Docker images
After editing the hosts file, I restarted the system’s hostname service to ensure the changes took effect:
sudo systemctl restart systemd-hostnamed
That was all, after this steps I could reach out a harbor web interface using core.harbor.domain.
To login, I had to use credentials:
Username: admin
Password: Harbor12345
Harbor CA
At this stage, I needed to download the root certificate for the registry. This can be done directly through the Harbor UI by navigating to: Configuration -> System Settings -> Repository Root Certificate
Certificate was saved to file called ca.crt
Since Docker uses TLS connections by default, I had to configure the GitLab Runner pod to trust this certificate, ensuring secure communication between the runner and the Harbor registry. More about it in next chapter.
Gitlab Runner
To configure the GitLab Runner, I began by adding the GitLab Helm repository:
helm repo add gitlab https://charts.gitlab.io
helm repo update gitlab
helm show values gitlab/gitlab-runner > gitlab.yaml
To securely connect the GitLab Runner to Harbor, I needed to create a Kubernetes secret containing the Harbor CA certificate. I accomplished this with the following command:
kubectl create secret generic harbor-ca-certs --from-file=ca.crt=ca.crt --namespace gitlab-runner # ca.crt
This command created a secret named harbor-ca-certs in the gitlab-runner namespace, incorporating the CA certificate file. This step was crucial, as it enabled the GitLab Runner to trust the Harbor registry’s TLS connections, facilitating secure interactions between the two services. See Harbor CA)
The last step was to prepare a configuration file. Here is mine:
concurrent: 1
rbac:
  create: true
  rules:
    - apiGroups: [""]
      resources:
        [
          "configmaps",
          "events",
          "pods",
          "pods/attach",
          "pods/exec",
          "pods/logs",
          "secrets",
          "services",
        ]
      verbs: ["get", "list", "watch", "create", "patch", "update", "delete"]
runners:
  config: |
    [[runners]]
      executor = "kubernetes"
      [runners.kubernetes]
        namespace = "{{.Release.Namespace}}"
        image = "docker:20.10"
        privileged = true
        allow_privilege_escalation = true
        [[runners.kubernetes.volumes.secret]]
          name = "harbor-ca-certs"  # This secret holds the Harbor CA cert
          mount_path = "/etc/docker/certs.d/core.harbor.domain/"
          read_only = true
        [[runners.kubernetes.volumes.empty_dir]]
          name = "repo"
          mount_path = "/builds"
          medium = "Memory"
I won’t go into detail about every configuration option, but the key parts of the setup are within the [[runners]] section.
First, I needed to run Docker containers inside my pipelines, so I specified the docker:20.10 image. The version here turned out to be surprisingly important. I spent quite a bit of time troubleshooting issues with newer versions, only to realize it was related to a well-known problem with the GitLab Runner’s health check system GitLab Issue. I couldn’t resolve it in my local environment, so as a workaround, I downgraded to an older Docker version, which solved the issue.
privileged = true- this allows the GitLab Runner to run Docker-in-Docker (DinD) containers, enabling it to build Docker images inside the pipeline.[[runners.kubernetes.volumes.secret]]- this mounts the Harbor CA certificate into the runner pod to ensure trusted communication with Harbor. The certificate is mounted at/etc/docker/certs.d/core.harbor.domain/, making it accessible to Docker.
For details I highly encourage to visit gitlab documentation.
Register Gitlab Runner
With the configuration ready, it was time to set up and run the GitLab Runner using Helm.
First, I needed to register a new runner through the GitLab UI. This is done by navigating to:
Settings -> CI/CD -> Runners
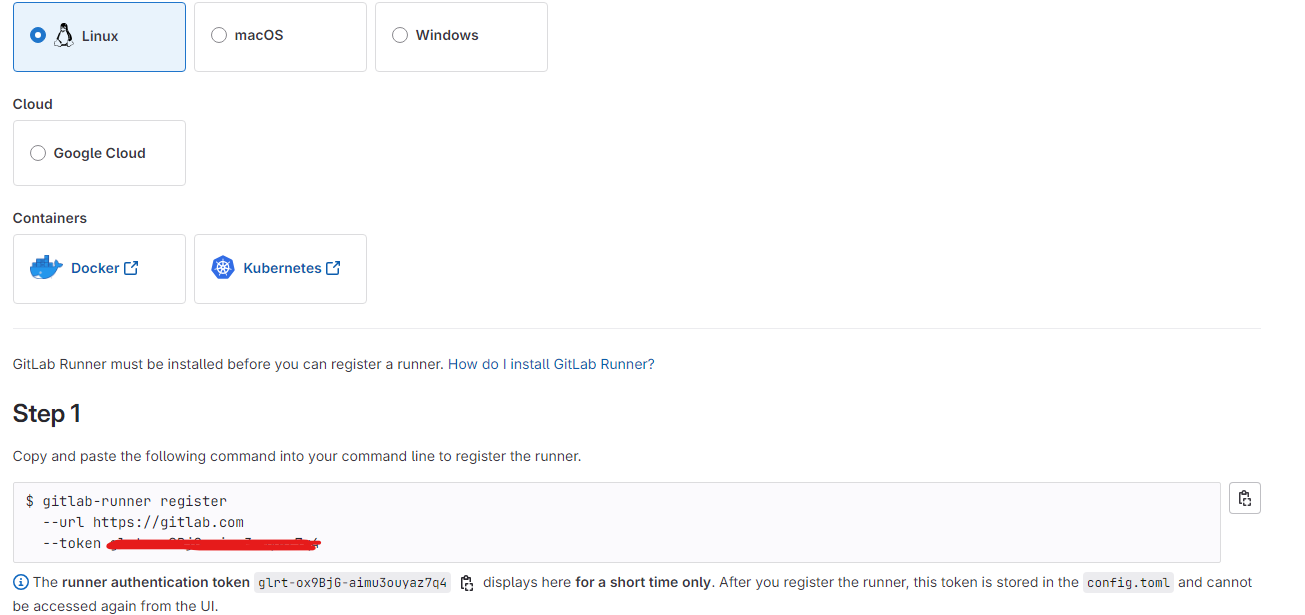
Here, I was able to generate a new registration token, which would be used to connect the GitLab Runner to my project, as shown in the screenshot below:

During the registration process, I decided to assign a tag, kubernetes, which would later be referenced in my GitLab pipeline to specifically target this runner for Kubernetes-related jobs.
Once the runner was created, GitLab generated a token that uniquely identifies the runner:

With the token in hand, the final step was to install the GitLab Runner Helm chart using the following command:
helm install --namespace gitlab-runner --create-namespace --atomic --debug --timeout 120s --set gitlabUrl="https://gitlab.com" --set runnerToken="<token>" --values gitlab.yaml gitlab-runner gitlab/gitlab-runner --version 0.68.1
Here’s a breakdown of what the command does:
- —namespace gitlab-runner —create-namespace: Specifies the namespace where the GitLab Runner will run, and creates it if it doesn’t already exist.
- —atomic: Ensures the installation is rolled back automatically if any errors occur during the process.
- —debug: Enables detailed logs to help troubleshoot if any issues arise during the deployment.
- —timeout 120s: Sets a timeout of 120 seconds for the Helm chart installation to complete.
- —set gitlabUrl=“https://gitlab.com”: Points the runner to my GitLab instance.
- —set runnerToken="
" : Provides the unique token generated during the runner registration to authenticate the runner with GitLab. - —values gitlab.yaml: Passes the customized configuration file I had previously created. With this command, the GitLab Runner was installed and fully integrated into my project, ready to run jobs tagged with kubernetes.
GitLab Repositories
I’ve set up two repositories to manage both the application and its deployment configuration: one for the Golang application and another for the Cluster configuration, which holds the deployment state managed by ArgoCD.
Application Repository
While I won’t dive into the full details of the repositories here, it’s important to highlight that the first repository contains a GitLab pipeline designed to automate the entire deployment process. Each time a new version of the Golang application is built, the pipeline pushes the Docker image to the Harbor registry and then updates the second repository (the cluster configuration) with the new application version.
This setup not only handles continuous deployment but also integrates with ArgoCD, ensuring that the cluster configuration repository always reflects the latest version of the application.
Feel free to use this approach as inspiration for setting up your own CI/CD workflows, which I belive might be a good choice for starting.
Configuration Repository
The second repository holds the configuration files that define the desired state of the Golang application within the Kubernetes cluster. ArgoCD monitors this repository and automatically syncs any changes, making it a key component in the GitOps process.
Argo CD
The last part of the play was Argo CD.
ArgoCD is a declarative GitOps tool for Kubernetes. It continuously monitors Git repositories and automatically synchronizes application manifests to a Kubernetes cluster. In our GitOps pipeline, ArgoCD will pull changes from the Git repository and apply them to the Minikube cluster, ensuring that the desired state of the application in Git is always reflected in the running environment. This automates deployments and keeps our applications in sync with the Git configuration.
To install ArgoCD, I began by adding the official Argo Helm and saving default configuration to file:
helm repo add argo https://argoproj.github.io/argo-helm
helm repo update
helm show values argo/argo-cd >> argo.yaml
I adjusted the following key configuration settings in the argo.yaml file: argo.yaml
    ingres.enabled: true
    server.insecure: true
- ingres.enabled: true: Enabled Ingress, allowing access to ArgoCD’s web UI externally via a defined URL.
- server.insecure: true: Disabled HTTPS enforcement for the ArgoCD server, allowing insecure (HTTP) access. This was useful for local development, simplifying the setup in a Minikube environment.
With the repository added and configuration set, the final step was to install the ArgoCD Helm chart into the argocd namespace. Here’s the command I used:
helm install argocd argo/argo-cd --namespace argocd --create-namespace -f argo.yaml
Once ArgoCD was installed, I retrieved the default admin password by running this command:
kubectl -n argocd get secret argocd-initial-admin-secret -o jsonpath="{.data.password}" | base64 -d
With the password in hand, I could access the ArgoCD web UI by navigating to argocd.example.com. To make this work locally, I needed to add a DNS record by editing the /etc/hosts file:
<minikube-ip> argocd.example.com
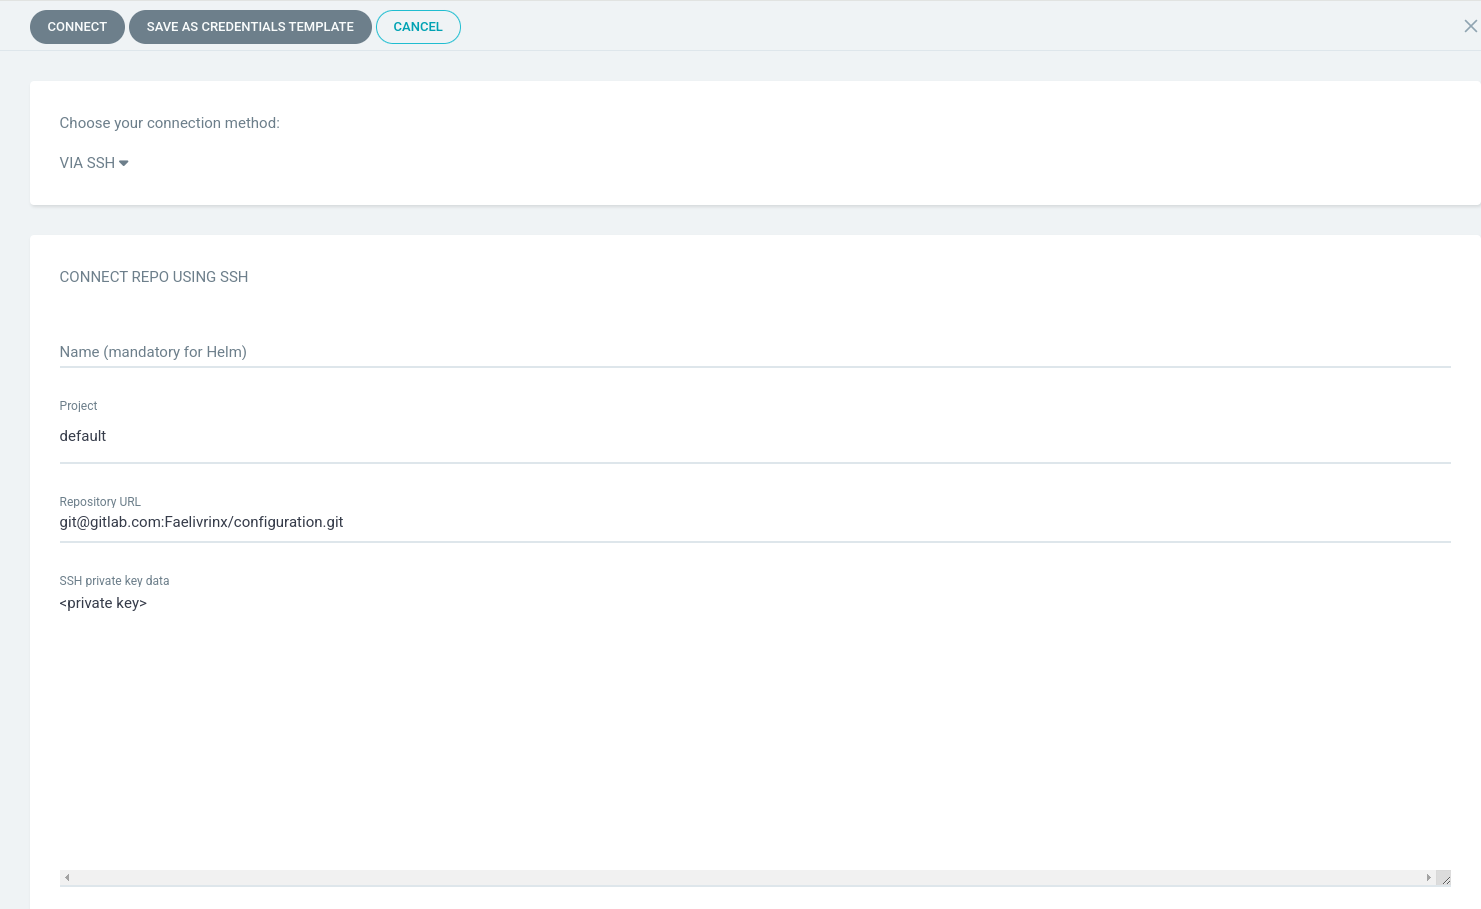
After logging, I had to create a repository pointing out my configuration repository. It was available under path: Settings -> Repositories -> Connect Repo. Image below shows that:

The only step is to create app, here is a my manifest file defining the golang-app:
project: default
source:
  repoURL: [email protected]:Faelivrinx/configuration.git # update to yours repository
  path: base/golang-app
  targetRevision: HEAD
destination:
  server: https://kubernetes.default.svc
  namespace: default
syncPolicy:
  automated: {}
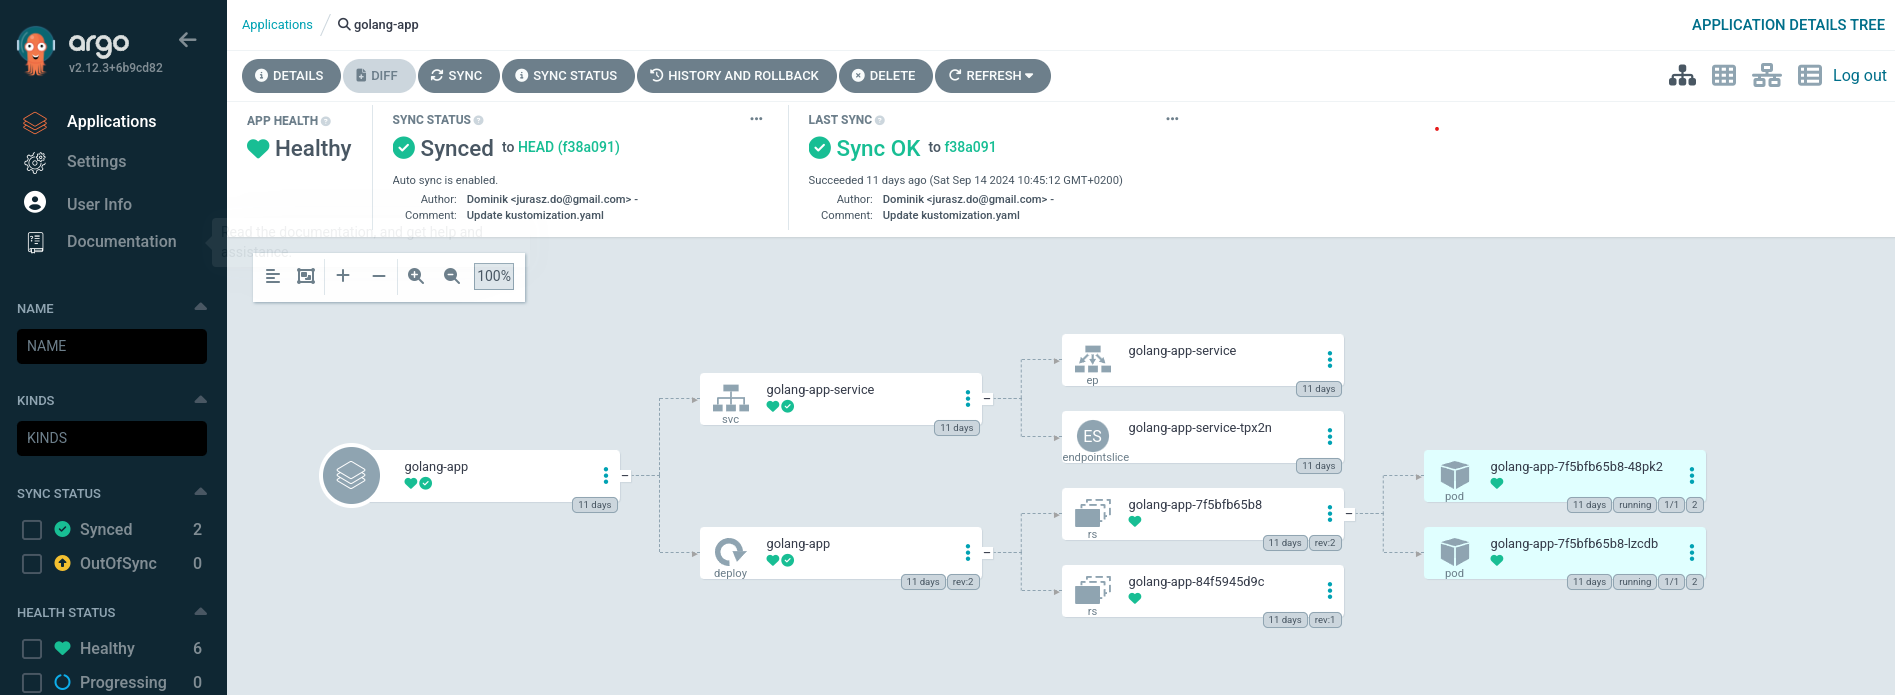
The screen below represents well configured app.
 .
.
Testing the GitOps Flow
To test the entire GitOps pipeline, I triggered the GitLab pipeline by pushing new changes to the master branch of my Golang app repository. This automatically initiated the pipeline, which built the updated application, pushed the new Docker image to Harbor, and incremented the patch version of the app. The pipeline then updated the configuration repository with the new version, and ArgoCD, monitoring this repository, detected the change and deployed the updated version of the app to the Kubernetes cluster seamlessly.
Summary
In this article, I demonstrated how to set up a complete GitOps-based Continuous Delivery pipeline using Harbor, GitLab Runner, and ArgoCD, all running locally on a Minikube cluster. We installed and configured Harbor as the Docker registry for secure image storage, set up GitLab Runner to handle CI tasks, and integrated ArgoCD to automate the deployment of our application to Kubernetes. By leveraging Helm for streamlined installation and customization, we created a fully automated workflow where pushing changes to the application repository triggers the entire pipeline—building, versioning, and deploying the app without manual intervention. This setup ensures that the application remains in sync with the desired state stored in the configuration repository, allowing for reliable and efficient continuous delivery.

Comments